Quality Control
1. Incoming Quality Control (IQC)
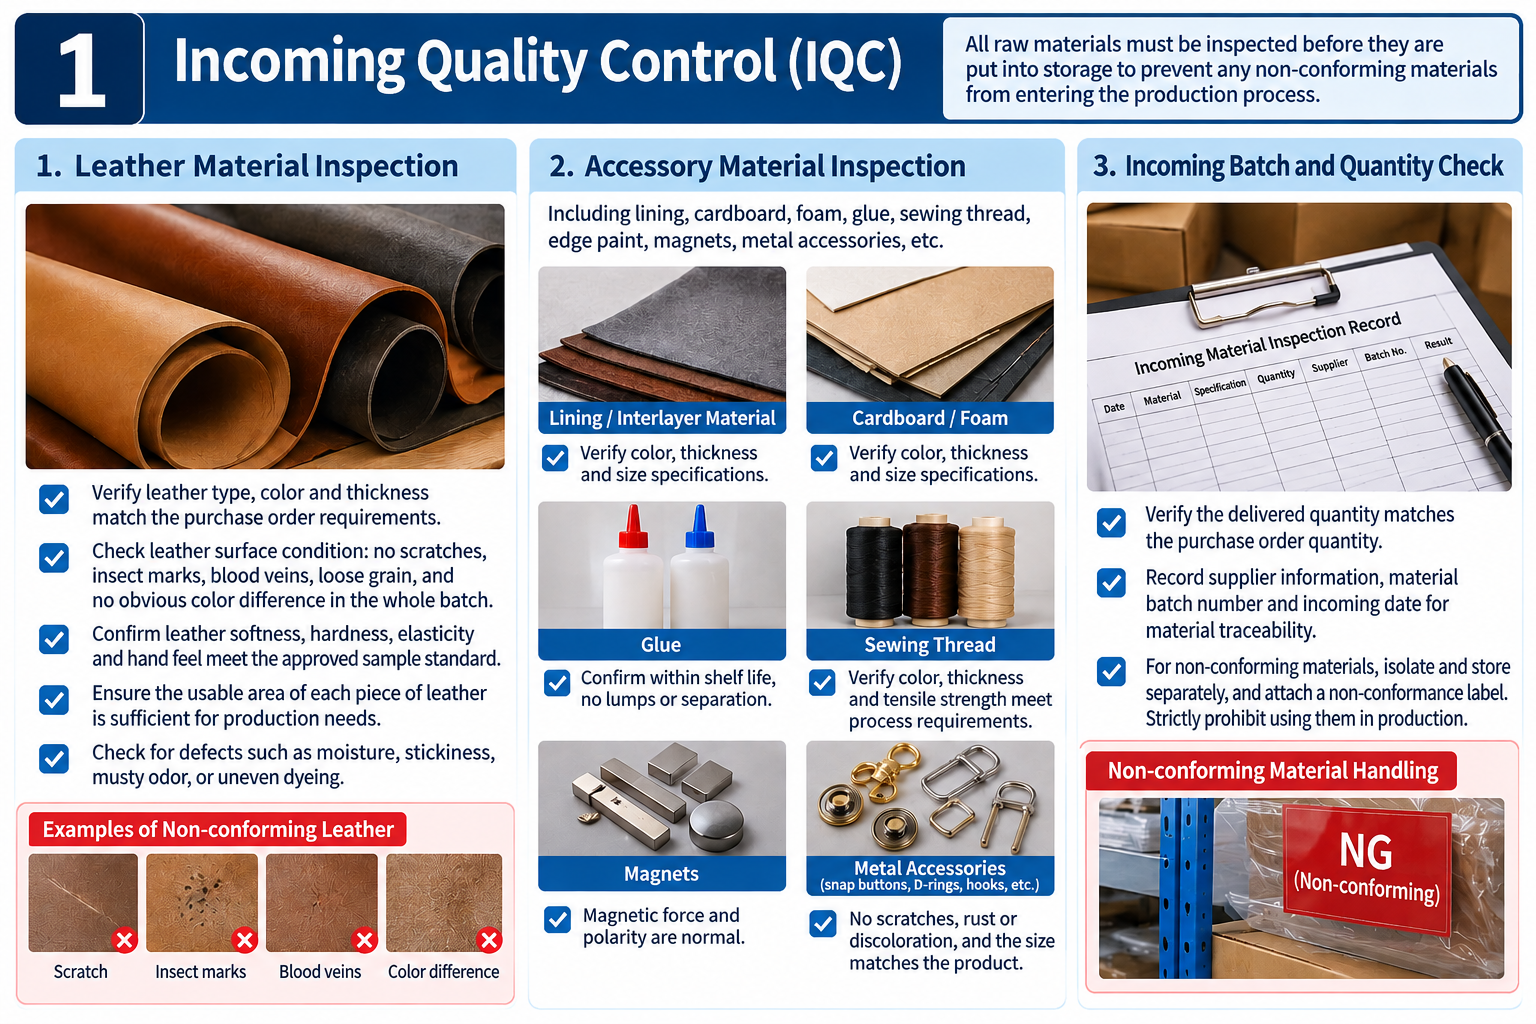
All raw materials are inspected before being stocked to prevent nonconforming materials from entering production.
Leather Material Inspection
Materials are checked against the purchase order and approved reference sample. Under natural or standard lighting, each hide is inspected by section—at the head, middle, and tail—to ensure the entire hide is assessed rather than relying on localized sampling.
Verify that the leather type, color, and thickness meet the purchase requirements.
Inspect the leather surface for scratches, insect marks, visible veins, or loose grain; ensure there is no significant color variation across the batch.
Confirm that the leather’s firmness, elasticity, and hand feel meet the approved sample standard.
Calculate the usable area of each hide to ensure it meets production requirements.
Check for defects such as dampness, tackiness, mold odor, or uneven dyeing.
2. Inspection of Auxiliary Materials
Auxiliary materials include lining, board, foam, adhesive, sewing thread, edge paint, magnets, and hardware components.
Lining and interlining materials: Verify color, thickness, and dimensions against specifications.
Adhesive: Confirm it is within its shelf life and shows no signs of clumping or separation.
Sewing thread: Check that the color, thickness, and tensile strength meet process requirements.
Magnets: Verify that the magnetic strength and polarity are normal.
Hardware components (such as snap fasteners, D-rings, and hooks): Check for scratches, rust, or discoloration, and confirm that the dimensions are compatible with the product.
3. Incoming Batch and Quantity Verification
Verify that the delivered quantity matches the purchase order.
Record supplier information, material batch numbers, and receipt dates to ensure traceability.
Isolate any materials found to be nonconforming during inspection, apply a clear nonconformance label, and strictly prohibit their use in production.
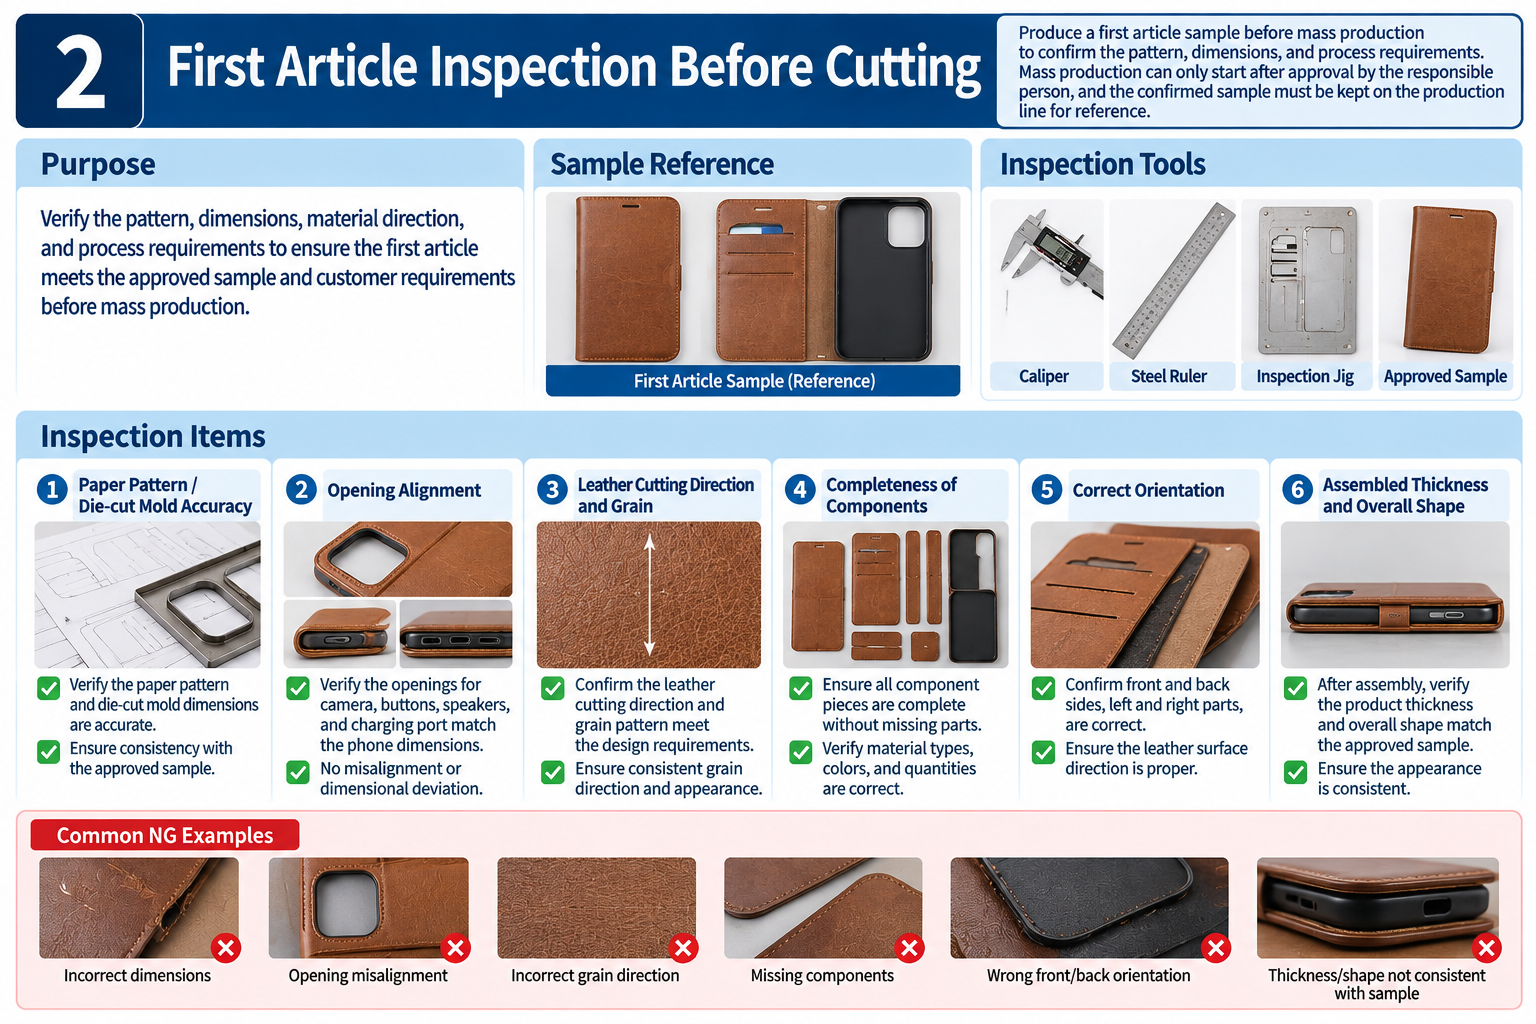
2. First-Article Inspection Before Cutting
Before mass production begins, a first-article sample is produced to verify the pattern and process requirements. Mass production may proceed only after the sample has been reviewed and approved by the person in charge. An approved reference sample is kept on the production floor for the production team to use for ongoing comparison.
Inspection Criteria
Dimensional accuracy of paper patterns and cutting dies.
Alignment of product openings with the phone’s outline, camera, buttons, and charging port.
Leather cutting direction and grain orientation meet design requirements.
All materials required for the component pieces are present, with no missing parts.
Correct orientation of the front and back, left and right pieces, and leather surfaces.
After assembly, the finished product’s thickness and overall shape match the approved reference sample.
3. Cutting Process Inspection
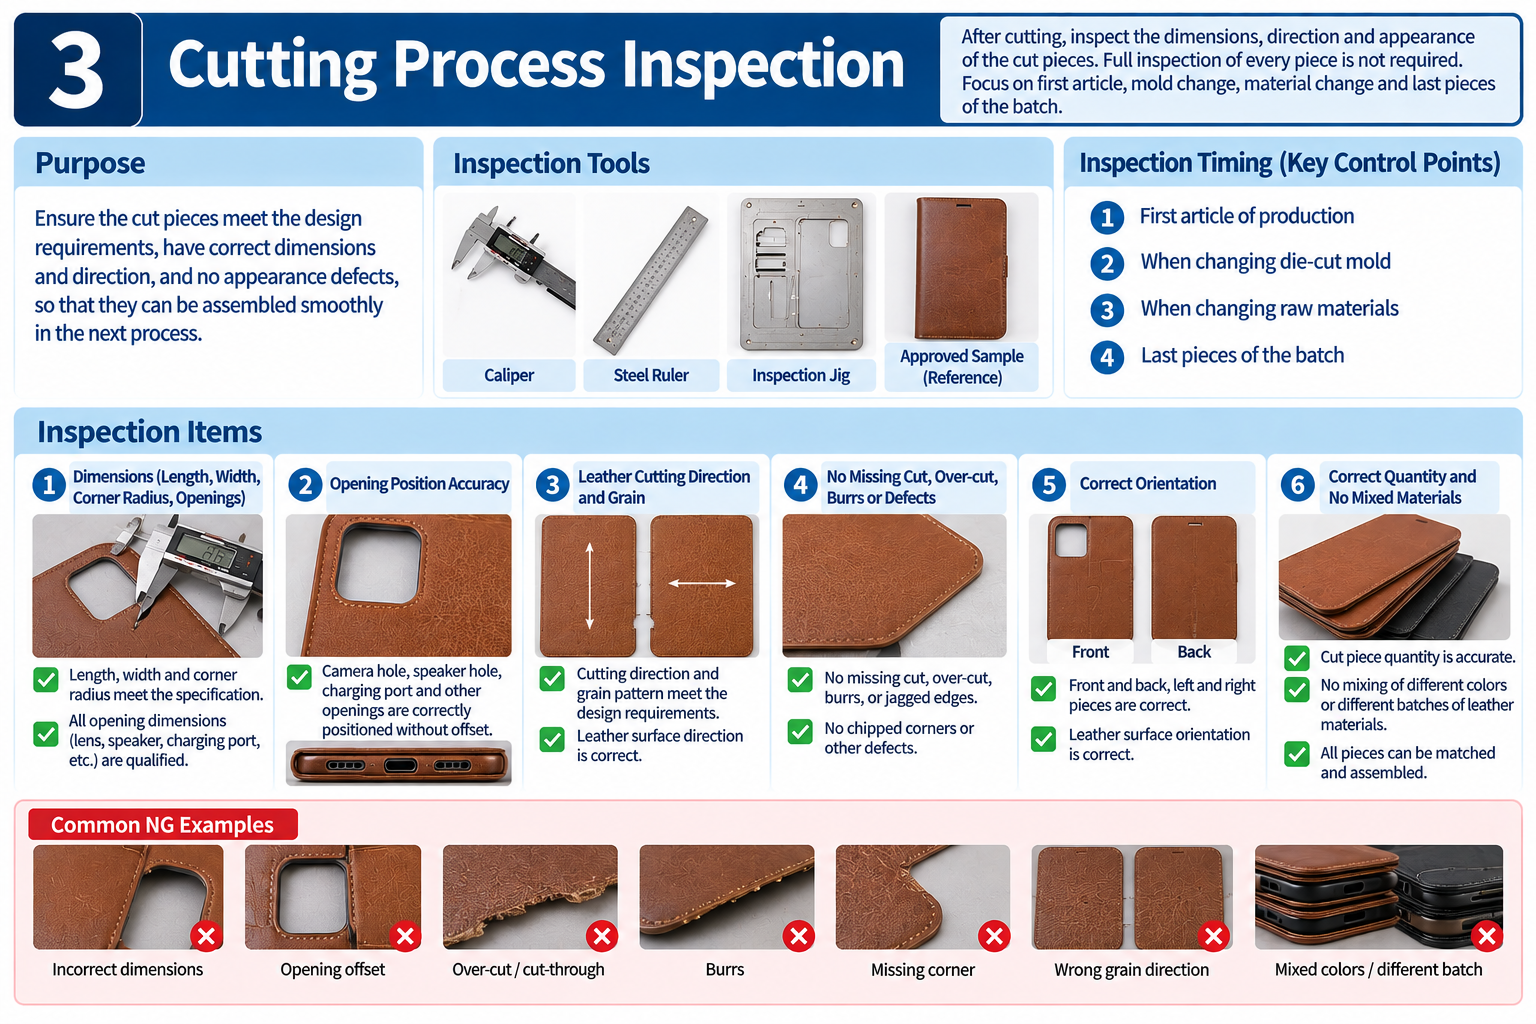
After cutting, the cut pieces are inspected for dimensions, orientation, and appearance. Rather than inspecting every piece, inspection focuses on the first article, tool-die changes, raw-material changes, and the final pieces in each batch. Calipers, steel rulers, dedicated gauges, phone-shaped templates, and approved reference samples may be used for comparison.
Verify that length, width, corner radii, and all openings meet specifications; ensure the camera, speaker, and charging-port openings are correctly positioned.
Check for defects such as incomplete cuts, cut-throughs, frayed edges, and chipped corners.
Confirm that the leather surfaces face the correct direction and that the cut pieces can be assembled as intended.
Verify the cut-piece quantity and ensure that leather in a different color or from another batch has not been mixed in.
Skiving, Layering, and Bonding Process Inspection
These processes directly affect the finished leather product’s thickness and shape. Inspection is carried out at two stages: before and after bonding.
Pre-Bonding Inspection
Ensure skiving is even and that skiving at folds and edge-wrapping areas has been completed according to process requirements.
Check for cut-throughs, damage to the leather surface, or obvious blade marks.
Confirm that the thickness of the assembled layers meets the required standard.
Verify that the lining and reinforcement pieces are correctly positioned.
Ensure bonding surfaces are clean and free of oil, dust, and other contaminants.
Post-Bonding Inspection
Check for adhesive separation, bubbles, excess adhesive, and wrinkles.
Ensure the layers are aligned without shifting and that the edges are even.
Confirm that adhesive has not seeped through to the leather surface or lining.
Check that bonding has not caused abnormal hardening, discoloration, or a strong, unpleasant odor.
Process requirement: Allow sufficient time for the adhesive to set and cure after bonding. Do not rush the process by pulling on the materials or proceeding directly to sewing.
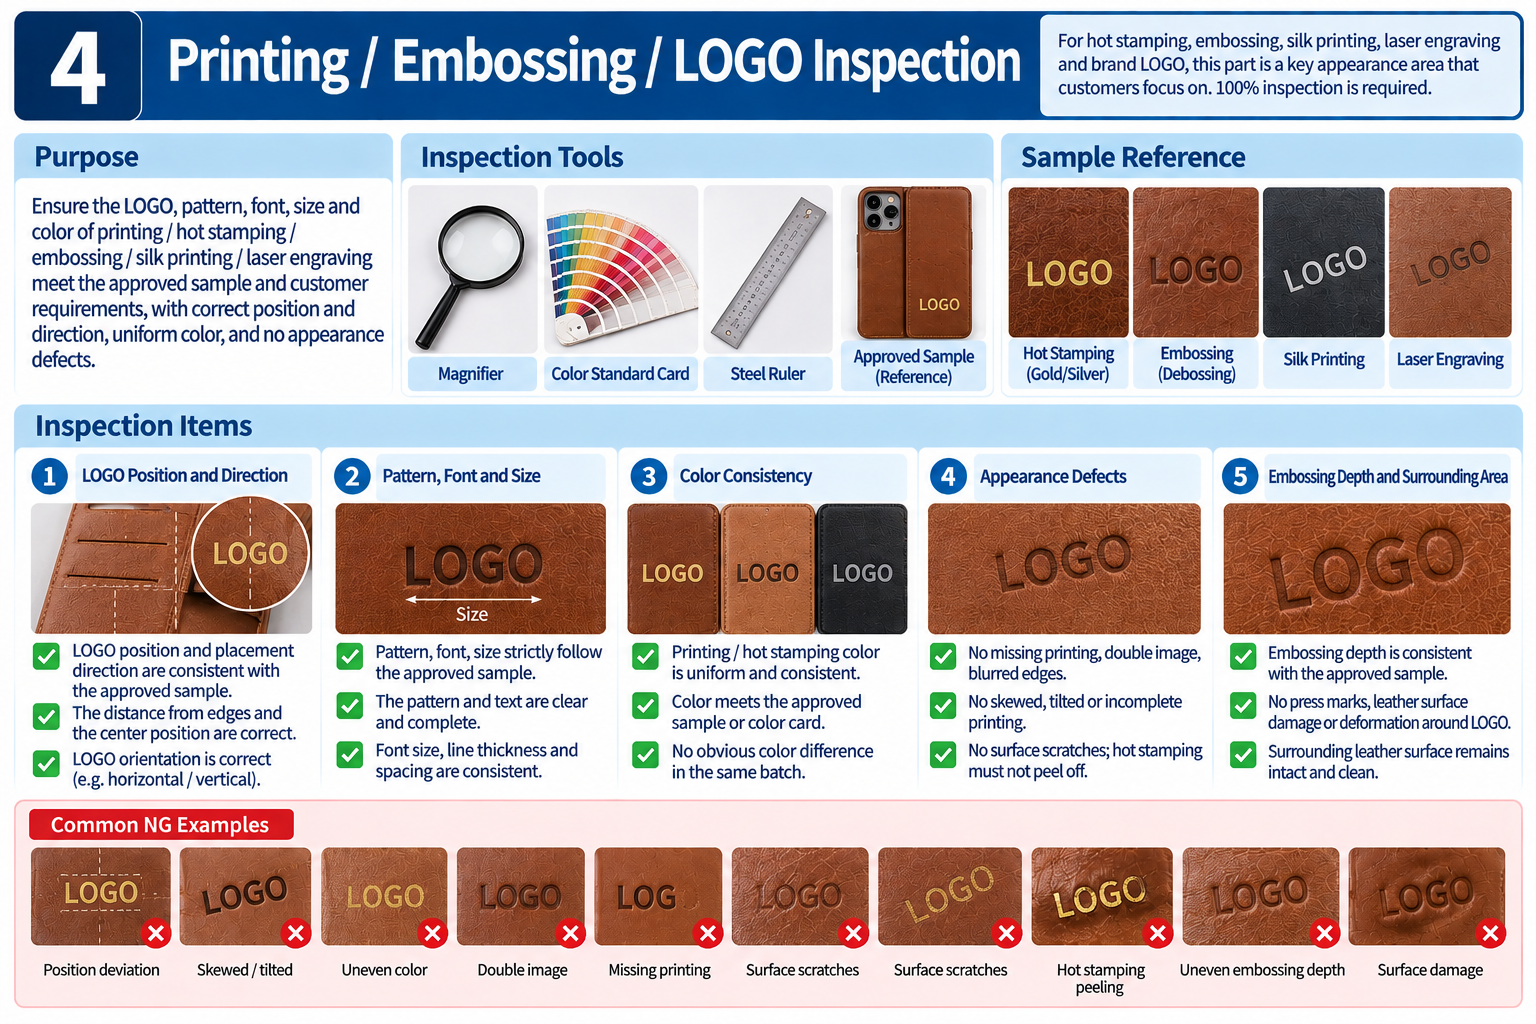
4. Printing, Embossing, and Logo Inspection
All appearance-related details—including foil stamping, embossing, screen printing, laser engraving, and brand logos—are critical to customers and are therefore inspected on every unit.
Verify that the logo’s position and orientation match the approved sample.
Ensure the design, font, and size strictly match the approved sample.
Check that printed and foil-stamped colors are even and consistent.
Check for missing prints, ghosting, misalignment, or surface scratches; ensure foil stamping does not peel or flake.
Ensure embossing depth is consistent, with no pressure marks around the logo or damage to the leather surface.
5. Printing, Embossing, and Logo Inspection
All appearance-related details—including foil stamping, embossing, screen printing, laser engraving, and brand logos—are critical to customers and are therefore inspected on every unit.
Verify that the logo’s position and orientation match the approved sample.
Ensure the design, font, and size strictly match the approved sample.
Check that printed and foil-stamped colors are even and consistent.
Check for missing prints, ghosting, misalignment, or surface scratches; ensure foil stamping does not peel or flake.
Ensure embossing depth is consistent, with no pressure marks around the logo or damage to the leather surface.
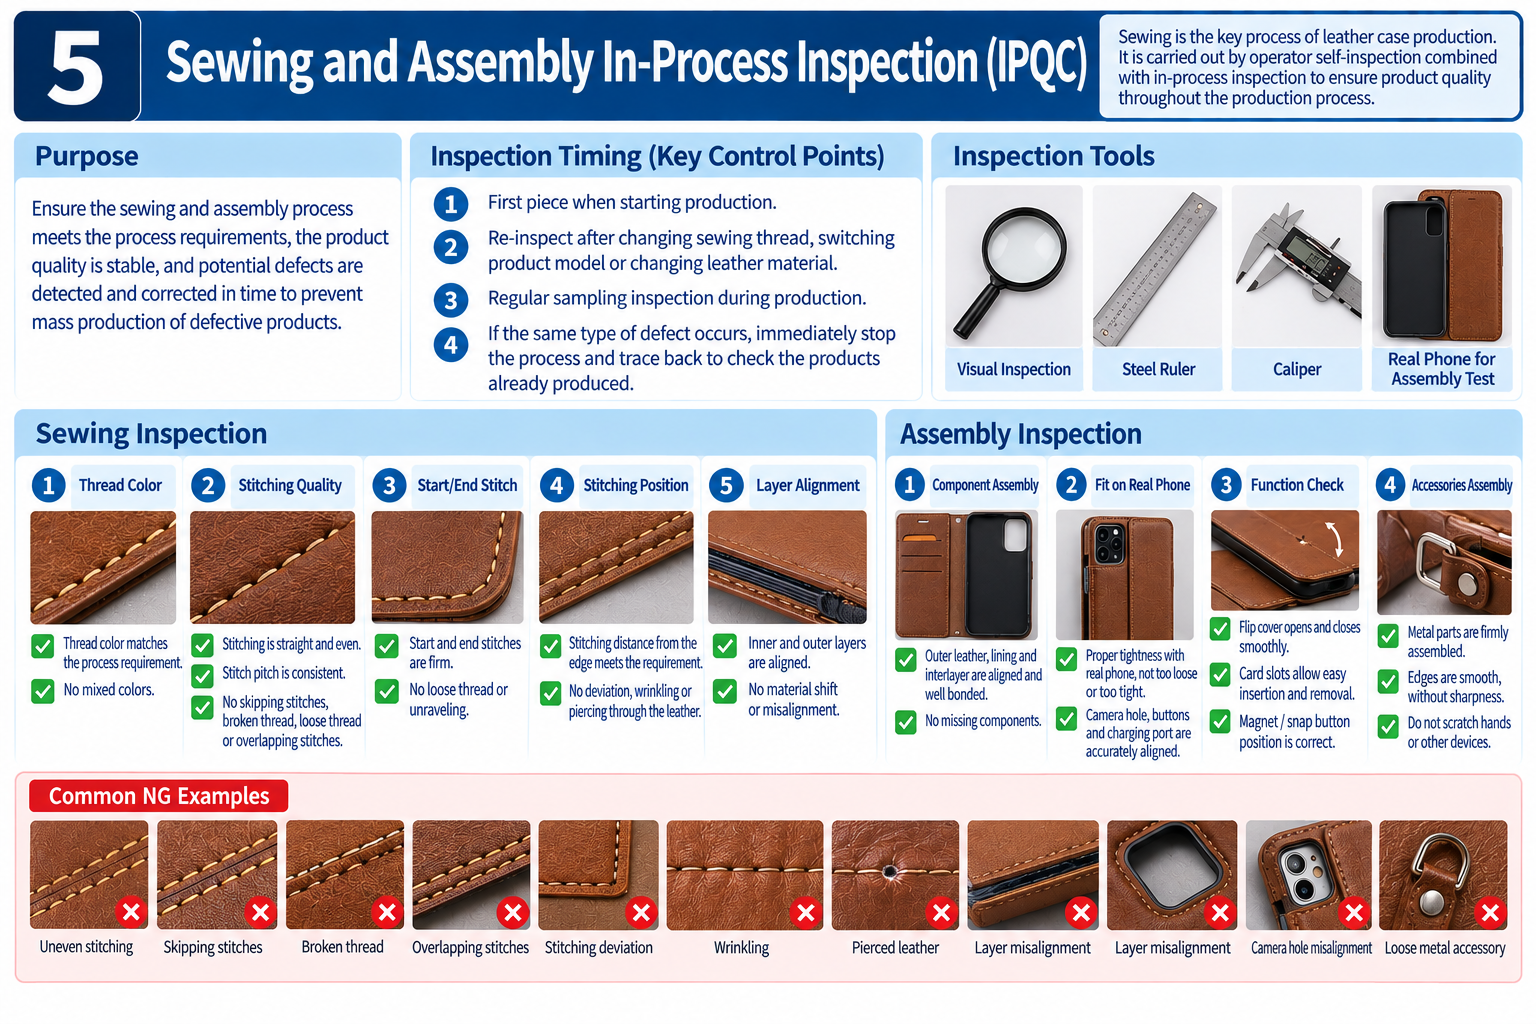
6. In-Process Inspection of Sewing and Assembly (IPQC)
Sewing is a core leather-goods manufacturing process. Quality control combines operator self-inspection with in-process inspection.
Sewing Inspection
Verify that the thread color meets process requirements.
Ensure stitching is straight and even, with consistent stitch length.
Check for skipped stitches, broken threads, loose threads, or overlapping stitches; ensure the starting and finishing stitches are secure.
Check for misaligned stitching, puckering, or stitching that has penetrated the leather surface.
Verify that the stitching is the correct distance from the edge and that the inner and outer layers are properly aligned.
Finished Product Assembly Inspection
Ensure the outer leather, lining, and interlayers are aligned and properly bonded.
Check that the actual phone fits securely—not too loose or too tight.
Verify the alignment of the camera, button, and charging-port openings.
Ensure that flaps and fold areas open, close, and bend smoothly.
Confirm that cards slide smoothly in and out of the card slots.
Verify that magnets and snap fasteners are correctly positioned.
Ensure hardware is securely attached and has smooth edges, with no risk of scratching hands or damaging the device.
In-Process Inspection Checkpoints
Inspect the first unit produced when production starts.
Reconfirm quality after changing the thread, switching product styles, or changing leather materials.
Conduct periodic sampling inspections during production.
If a recurring defect is found, stop the process immediately and trace and inspect products already made.
7. Edge Wrapping, Edge Painting, and Surface Finish Inspection
Edge-Wrapping Inspection
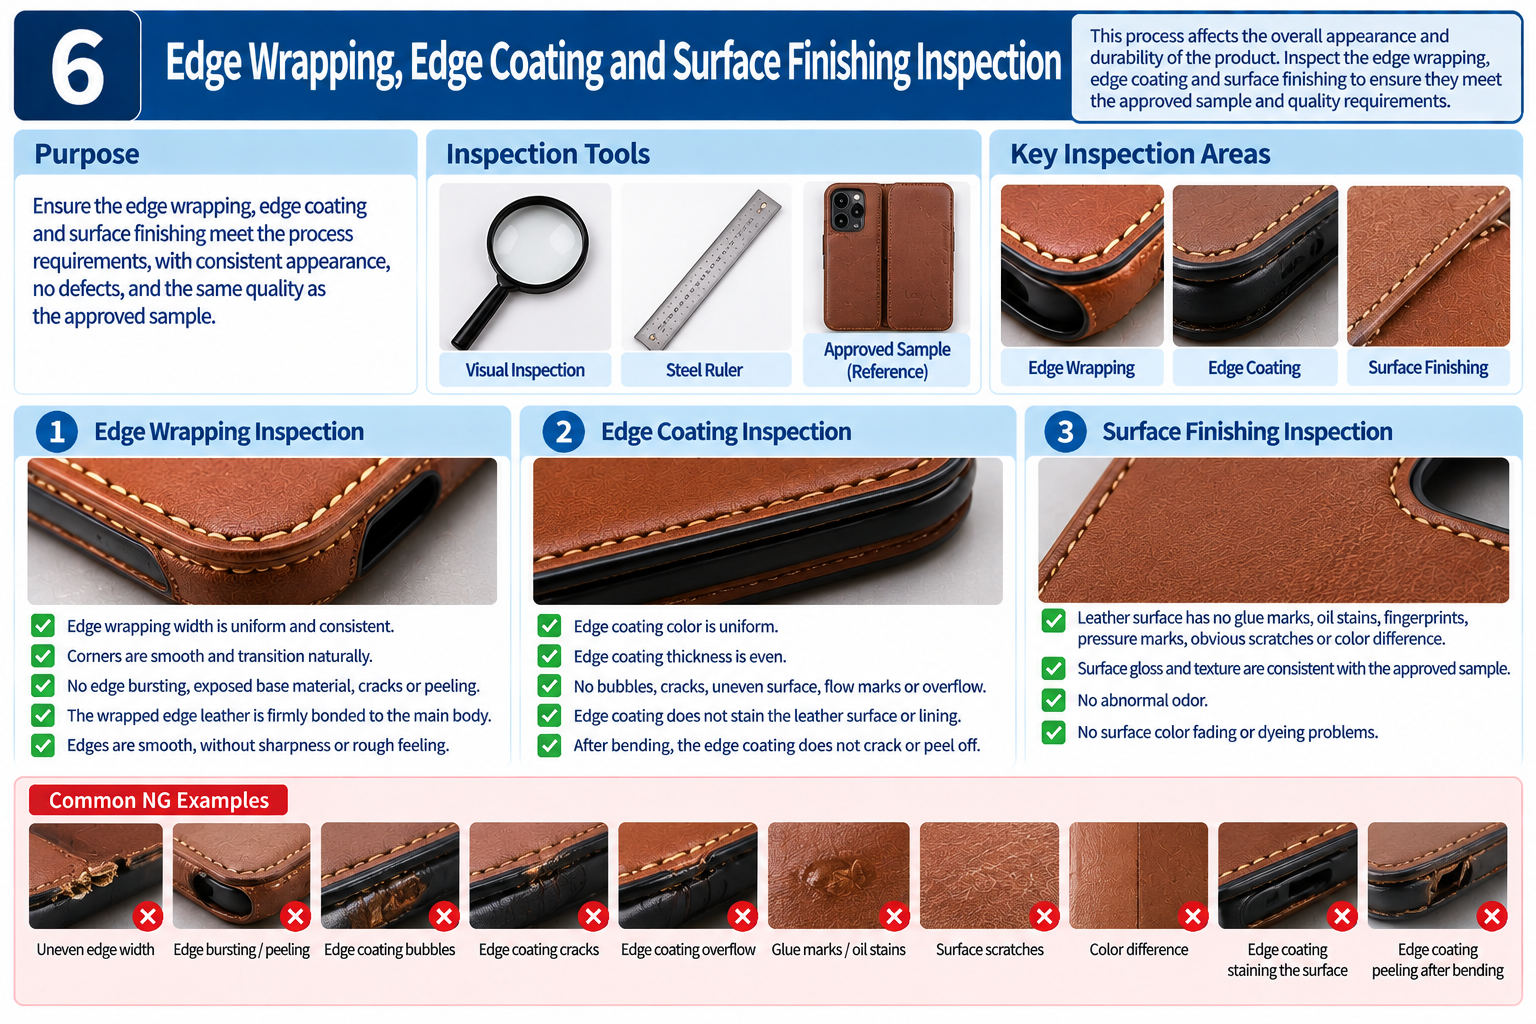
Ensure the edge-wrapping width is consistent and transitions smoothly around corners.
Check for split edges, exposed backing, cracks, or peeling; ensure the edges are not rough or sharp to the touch.
Confirm that the edge leather is securely bonded to the main body.
Edge-Paint Inspection
Ensure the edge-paint color is consistent and its thickness is even.
Check for bubbles, cracks, unevenness, runs, or overflow.
Ensure edge paint does not stain the leather surface or lining; after bending, it must not crack or peel.
Finished-Surface Inspection
Check that the leather surface is free of adhesive marks, oil stains, fingerprints, pressure marks, obvious scratches, and color variation.
Ensure the product’s surface sheen matches the approved reference sample.
Check for unusual odors and any surface color transfer or staining.
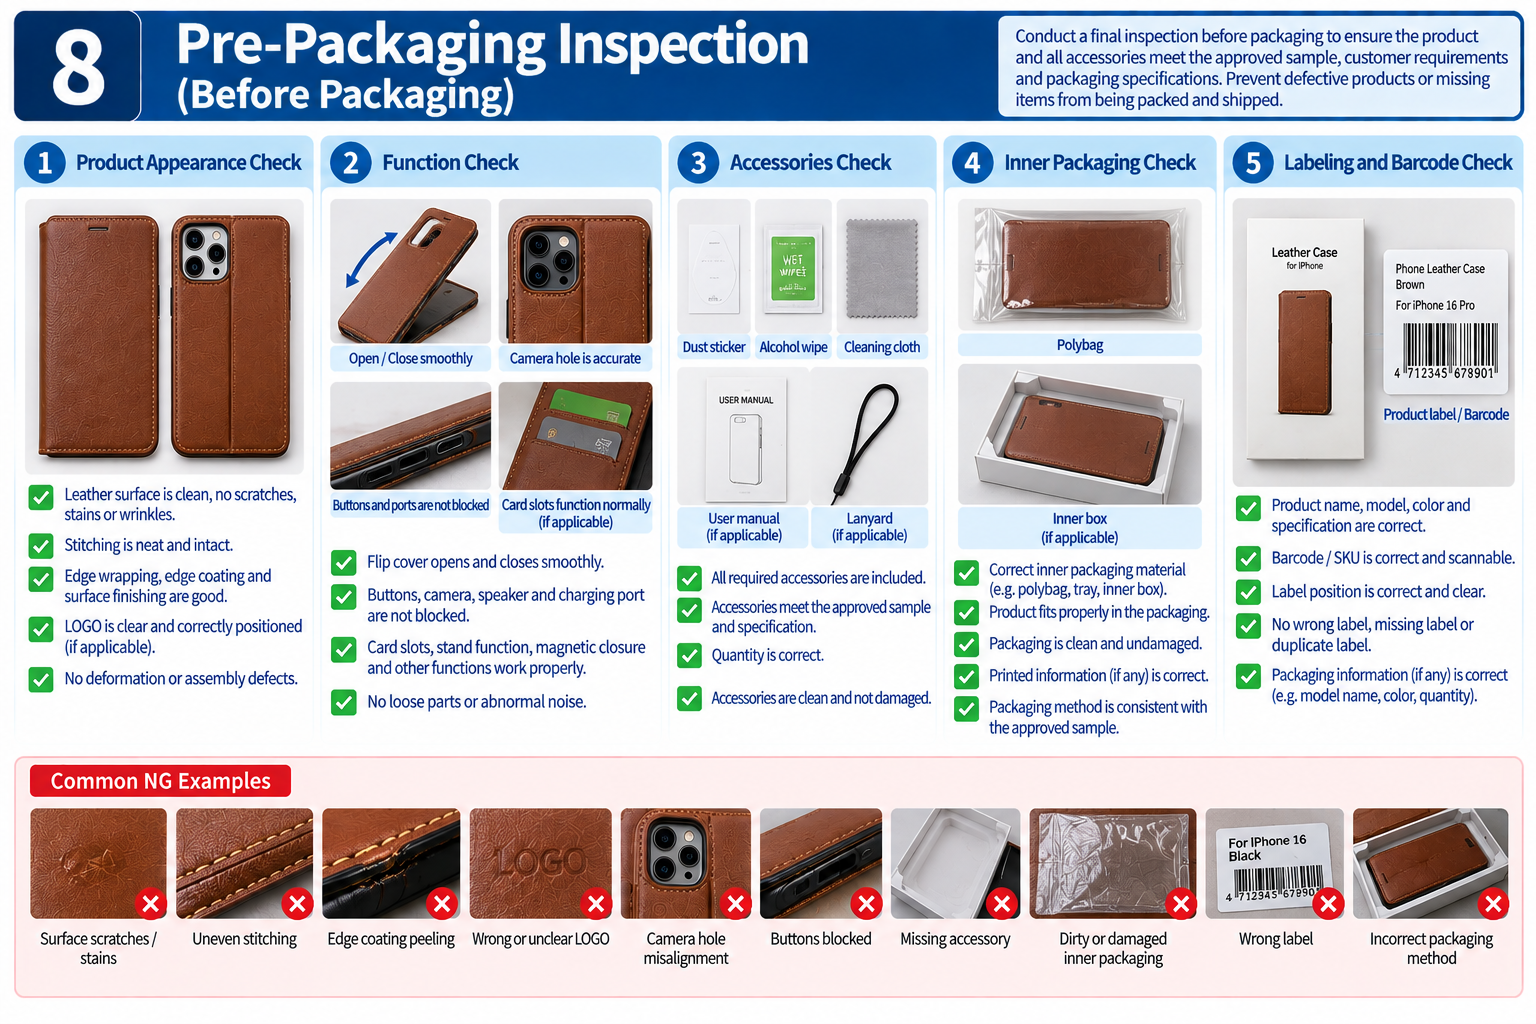
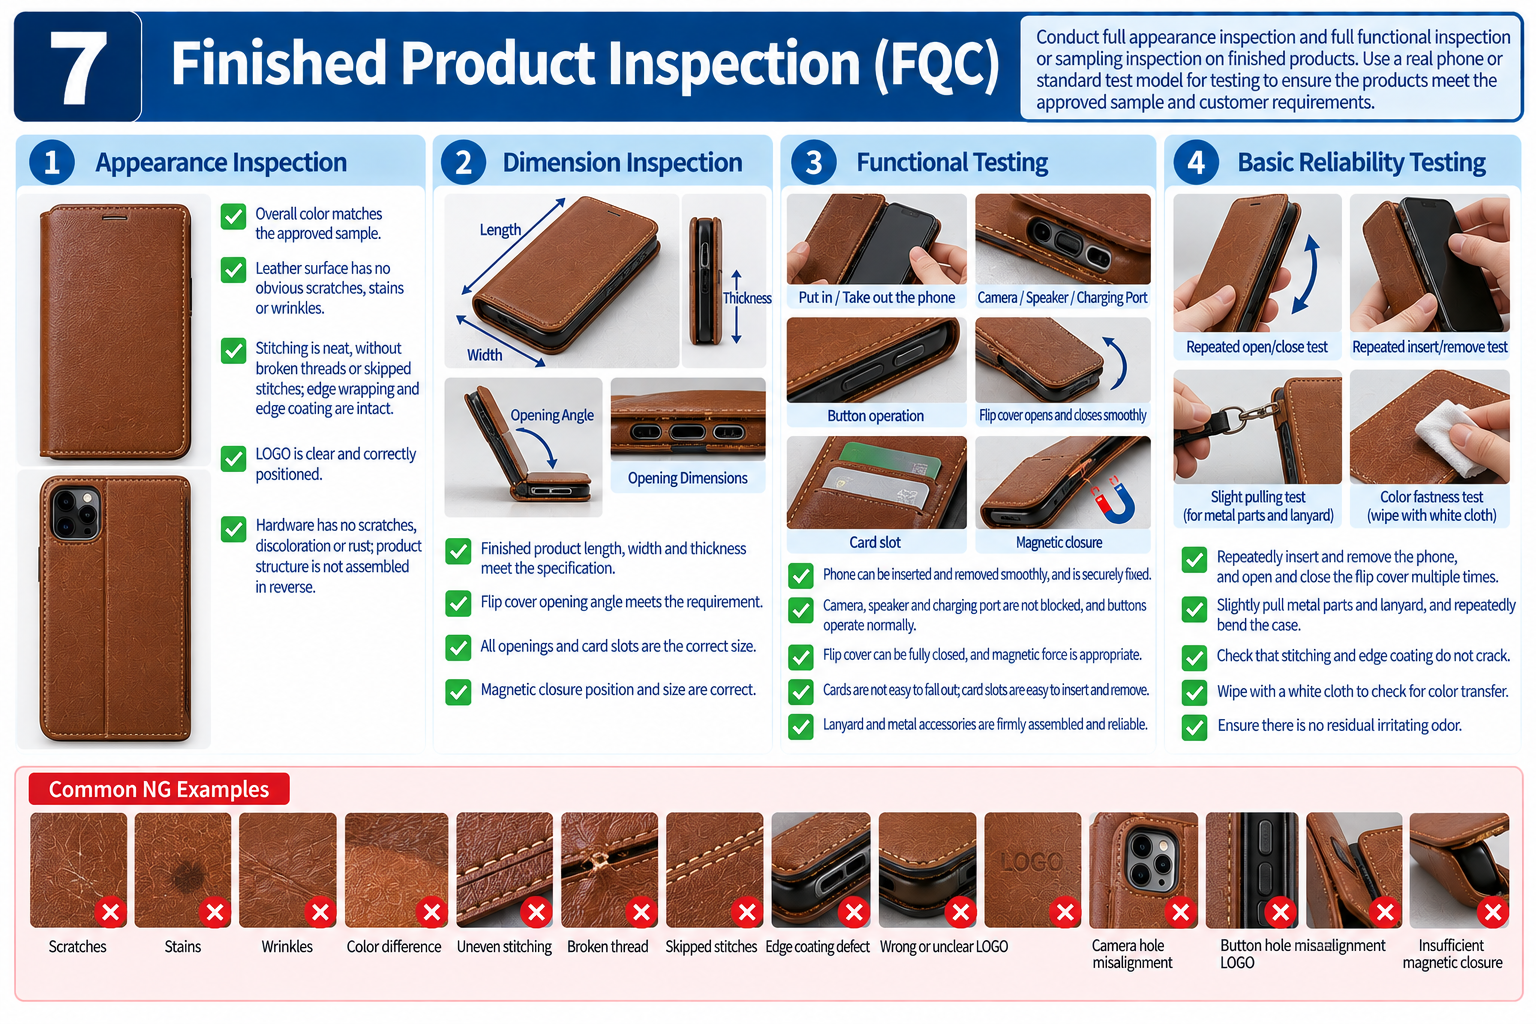
8. Finished Product Quality Control (FQC) | Pre-Packaging Inspection
Conduct a 100% visual inspection and either a 100% functional inspection or sampling inspection, using an actual phone or a standard test model.
1. Appearance Inspection
Ensure the overall color matches the approved reference sample.
Check that the leather surface is free of obvious damage, stains, and wrinkles.
Ensure stitching is neat, with no broken threads or skipped stitches, and that edge wrapping and edge paint are intact.
Verify that the logo is clear and correctly positioned.
Check that hardware is free of scratches, discoloration, and rust, and that the product is assembled in the correct orientation.
2. Dimensional Inspection
Check the finished product’s length, width, and thickness, as well as the opening angle of the flap.
Verify the dimensions of all openings and card slots, along with the positioning of the magnetic closure.
3. Functional Testing
Confirm that the phone can be inserted and removed smoothly and is held securely.
Ensure the camera, speaker, and charging port are unobstructed and that the buttons function properly.
Verify that the flap closes completely and that the magnets provide appropriate holding force.
Check that cards are held securely and that the strap and hardware are firmly attached.
4. Basic Reliability Testing
Professional laboratory testing is not required; conduct basic simulated-use tests instead:
Insert and remove the phone repeatedly, and open and close the flap multiple times.
Gently pull on the hardware and strap, and bend the phone case repeatedly.
Check that the stitching and edge paint do not crack; use a white-cloth rub test to check for color transfer from the surface.
Check the finished product for any lingering pungent or irritating odors.
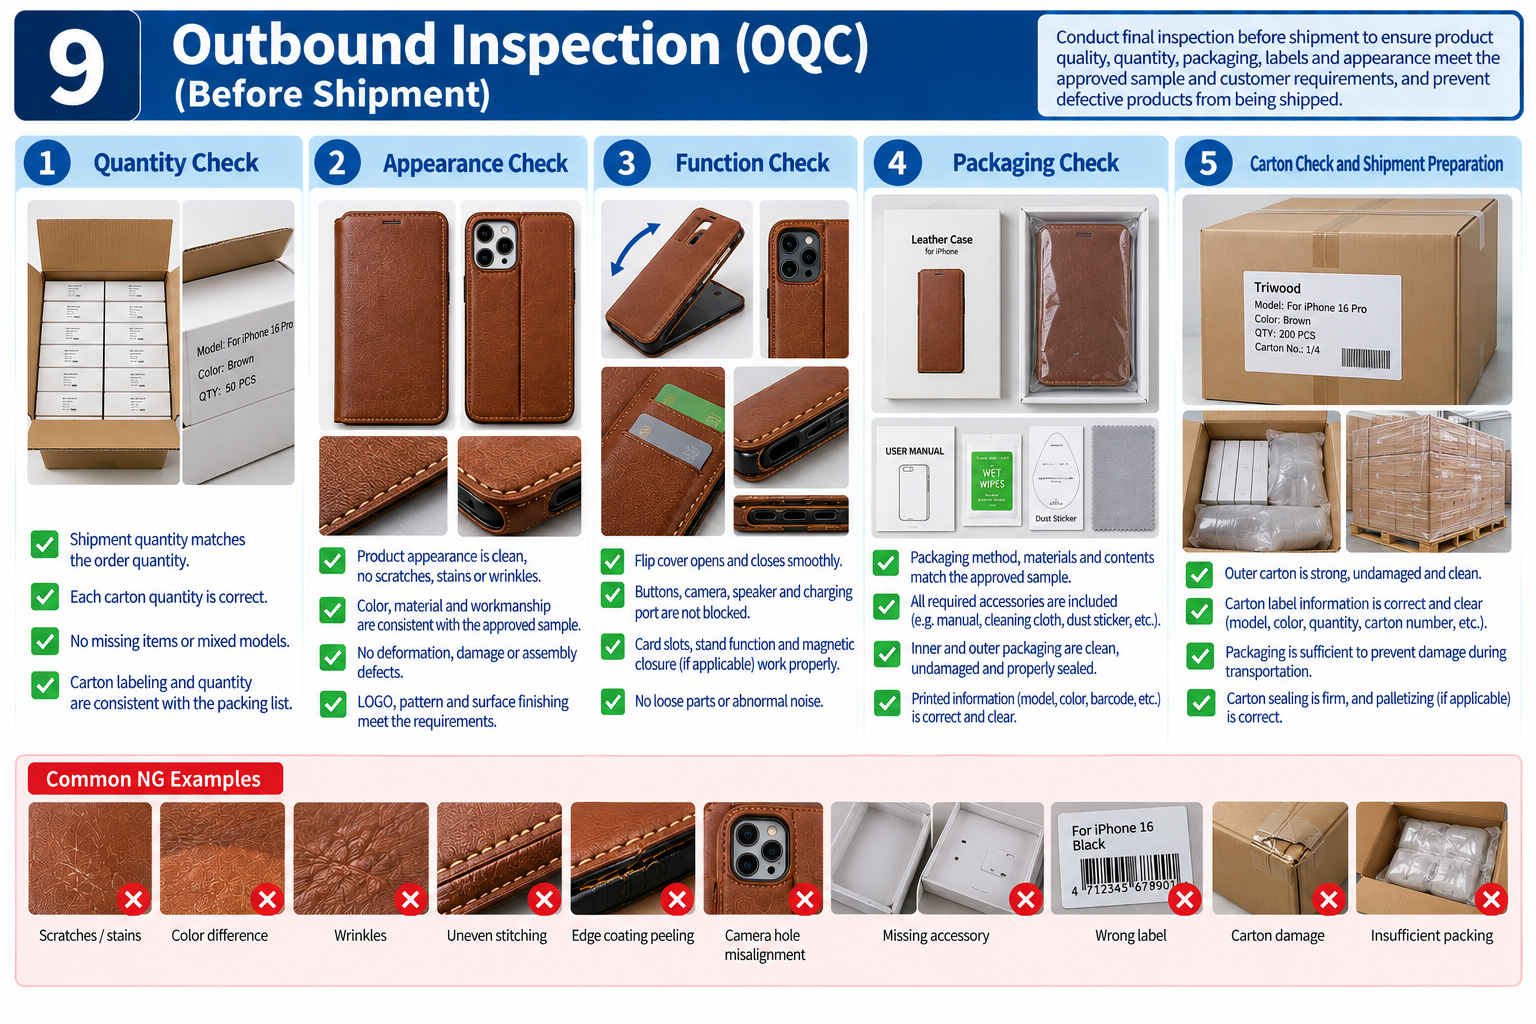
9. Pre-Packaging Inspection
Before products are placed in bags or boxes, packaging personnel conduct a final verification against the order to prevent errors in model or color, even when the product’s appearance meets quality standards.
Verify that the product model, color, and quantity are correct, and that left and right components are properly matched.
Ensure no defective products are included in the packaging.
Confirm that all accessories and inserts—such as straps, instruction leaflets, and care cards—are included.
Verify that dust bags, stickers, and barcode labels are correct.
Remove any loose threads, leather scraps, dust, adhesive residue, or other debris from inside the packaging.
Outgoing Quality Control (OQC)
Before shipment, designated personnel conduct a final review of the entire batch. Rather than repeating a 100% inspection of every unit, the review focuses on confirming that the batch as a whole meets requirements, with sample checks of product appearance and functionality. Once approved, the shipment is sealed and handed over to the logistics provider.
Verify that the total shipment quantity, product models, colors, and styles match the order.
Check that carton labels, customer information, and destination markings are correct.
Ensure the quantity per carton meets requirements, with no mixed styles or colors and no shortages.
Confirm that cartons are in good condition, securely sealed, and protected against moisture.
Strictly follow all customer-specified packaging standards and labeling requirements.
Simplified Factory QC Control Process
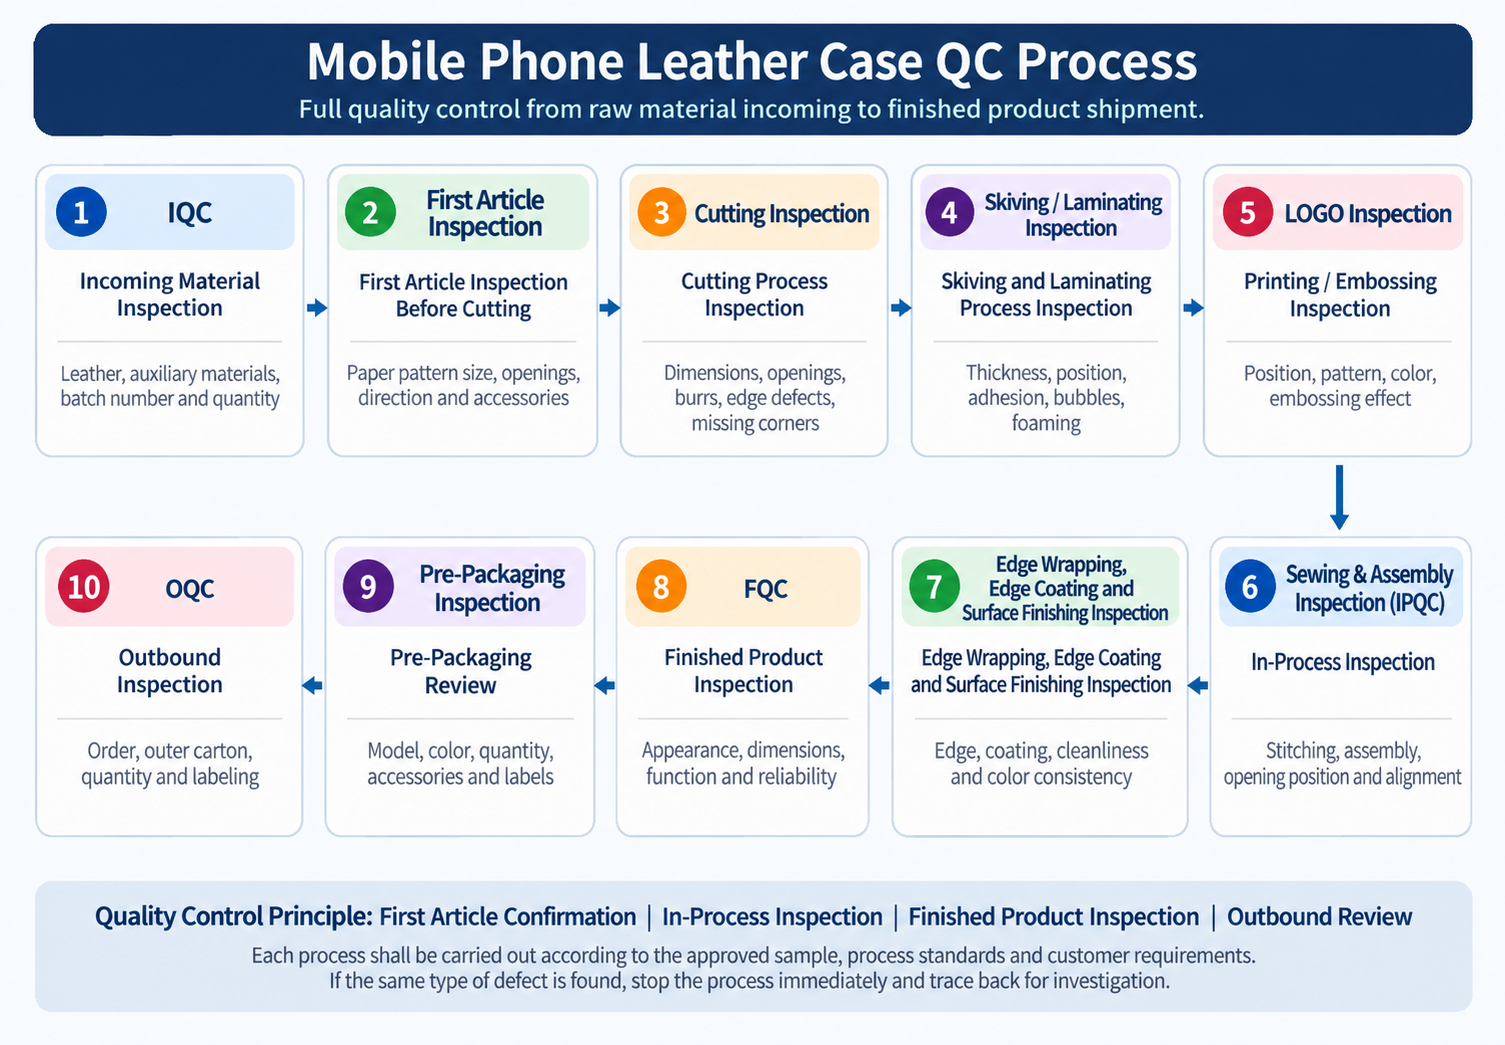
Incoming Quality Control (IQC) → Pre-Cutting First-Article Approval → Cutting Process Inspection → Skiving & Bonding Inspection → Logo Printing & Embossing Inspection → Sewing & Assembly In-Process Inspection (IPQC) → Edge Wrapping, Edge Painting & Surface Finish Inspection → Finished Product Quality Control (FQC) → Pre-Packaging Inspection → Outgoing Quality Control (OQC)